In today's interconnected world, the Internet of Things (IoT) is transforming industries and daily life, but managing and securing these devices remotely presents unique challenges. This is where the synergy of a remoteiot vpc network aws truly shines, offering a robust, scalable, and secure foundation for your IoT deployments. Building such an infrastructure allows you to harness the power of edge computing with Raspberry Pi while leveraging the unparalleled cloud capabilities of Amazon Web Services (AWS) to process, store, and analyze your data securely and efficiently.
This comprehensive guide will delve into the intricacies of VPC networks, Raspberry Pi configurations, and AWS integration, providing you with the knowledge and tools to implement this cutting-edge solution. Whether you're building a smart home, automating industrial processes, or exploring new frontiers in IoT, this setup gives you the control and security you need. By following the steps outlined in this article, you can create a secure, scalable, and efficient infrastructure that's tailored to your specific IoT needs.
Table of Contents
- The Core Synergy: Remote IoT, VPC, Raspberry Pi, and AWS
- Prerequisites and Essential Tools for Your Remote IoT VPC Network
- Step-by-Step: Setting Up Your AWS VPC for Remote IoT
- Preparing Your Raspberry Pi for AWS Integration
- Establishing Secure Connectivity: SSH and VPN Options
- Best Practices for a Scalable and Resilient Remote IoT VPC Network
- Overcoming Challenges and Troubleshooting Common Issues
- Future-Proofing Your Remote IoT Deployment
The Core Synergy: Remote IoT, VPC, Raspberry Pi, and AWS
The concept of a remote IoT network isn't new, but the combination of Raspberry Pi's versatility, AWS's cloud infrastructure, and the isolation of a Virtual Private Cloud (VPC) creates a particularly powerful and secure ecosystem. This is where the synergy of remoteiot, vpc networks, raspberry pi, and amazon web services (aws) truly shines. Imagine having thousands of IoT devices deployed across various locations, each needing to communicate securely and efficiently with a central cloud platform. Without a well-architected network, this quickly becomes a security and management nightmare.
Why Remote IoT Demands Robust Networking
Remote IoT devices, by their very nature, often operate in environments outside the traditional data center. They might be in factories, agricultural fields, smart cities, or even remote wilderness areas. This geographical distribution introduces significant challenges:
- Security: Devices connected directly to the public internet are vulnerable to attacks. Data transmitted must be encrypted, and access to devices must be tightly controlled.
- Reliability: Connectivity can be intermittent. The network needs to be resilient enough to handle these fluctuations and ensure data integrity.
- Scalability: IoT deployments often start small but can grow exponentially. The network infrastructure must be able to scale seamlessly without requiring a complete re-architecture.
- Management: Deploying, monitoring, updating, and troubleshooting hundreds or thousands of devices remotely requires sophisticated tools and a centralized management plane.
- Data Privacy & Compliance: Depending on the industry (e.g., healthcare, finance), strict regulations govern data handling. A secure network is paramount for compliance.
These demands necessitate a robust, private, and flexible network architecture, which is precisely what an AWS VPC provides.
The Power of AWS VPC for IoT
AWS VPC allows you to provision a logically isolated section of the AWS Cloud where you can launch AWS resources in a virtual network that you define. Think of it as your own private data center within AWS. The aws vpc provides the secure and scalable infrastructure needed to manage and process the data from your remote IoT devices. Key benefits for IoT include:
- Network Isolation: Your IoT devices and the AWS resources they interact with are isolated from other AWS customers' networks, significantly reducing the attack surface.
- Custom IP Addressing: You can define your own IP address ranges, subnets, route tables, and network gateways, giving you complete control over your network topology.
- Enhanced Security Features: VPCs integrate seamlessly with AWS security services like Security Groups and Network Access Control Lists (NACLs), allowing you to filter traffic at the instance and subnet level.
- Scalability and Flexibility: Easily add or remove subnets, instances, and services as your IoT deployment grows or evolves, without disrupting existing operations.
- Hybrid Connectivity: Connect your VPC to your on-premises networks using AWS Direct Connect or VPN, enabling seamless data flow between your edge devices and corporate systems.
By leveraging AWS VPC, you create a dedicated, secure channel for your Raspberry Pi devices to communicate with your cloud applications, ensuring data integrity and operational security.
Prerequisites and Essential Tools for Your Remote IoT VPC Network
Setting up a remoteiot vpc network on aws involves several steps, each of which is crucial for ensuring a successful deployment. Before diving into the configuration, you'll need a few things in place. This guide is tailored for Windows users who want to set up a secure connection to their Raspberry Pi using SSH over AWS VPC, but the core concepts apply universally.
Here's what you'll need:
- An AWS Account: If you don't have one, you can sign up for the AWS Free Tier, which offers many services for free up to certain limits, making it ideal for experimenting with this setup.
- Raspberry Pi Device: Any model capable of running a modern Linux distribution (e.g., Raspberry Pi 3, 4, or Zero 2 W) will work. Ensure it has an operating system installed (Raspberry Pi OS Lite is recommended for headless operations).
- Internet Connection: For both your local machine and the Raspberry Pi to initially connect to AWS.
- SSH Client: For Windows users, PuTTY or Windows Subsystem for Linux (WSL) with OpenSSH are excellent choices. You'll learn how to download and configure these.
- Text Editor: A good code editor like Visual Studio Code, Notepad++, or Sublime Text for editing configuration files.
- Basic Understanding of Networking: Familiarity with concepts like IP addresses, subnets, and routing will be beneficial.
- AWS CLI (Optional but Recommended): The AWS Command Line Interface allows you to manage your AWS services from your terminal, which can automate tasks and streamline your workflow.
We'll explore the tools, configurations, and best practices in detail. Ensuring you have these prerequisites covered will make the setup process smoother and more efficient.
Step-by-Step: Setting Up Your AWS VPC for Remote IoT
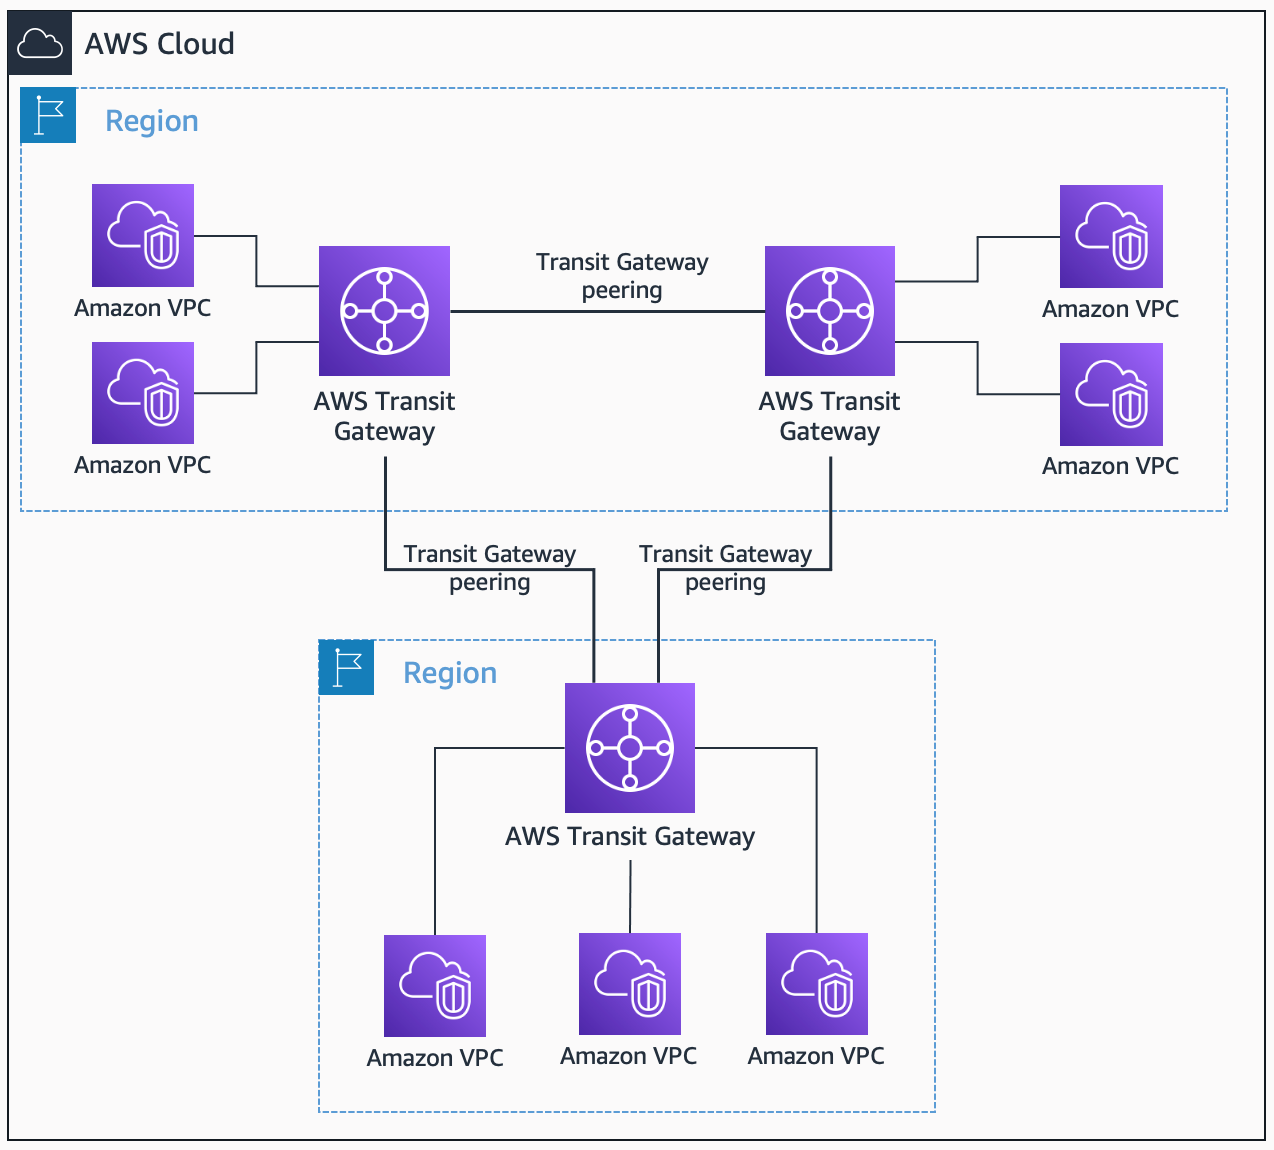
Deploying a scalable VPC architecture on AWS Cloud for your remote IoT setup is a foundational step. This section will walk you through creating your custom network environment within AWS.
Crafting Your Secure Network Architecture
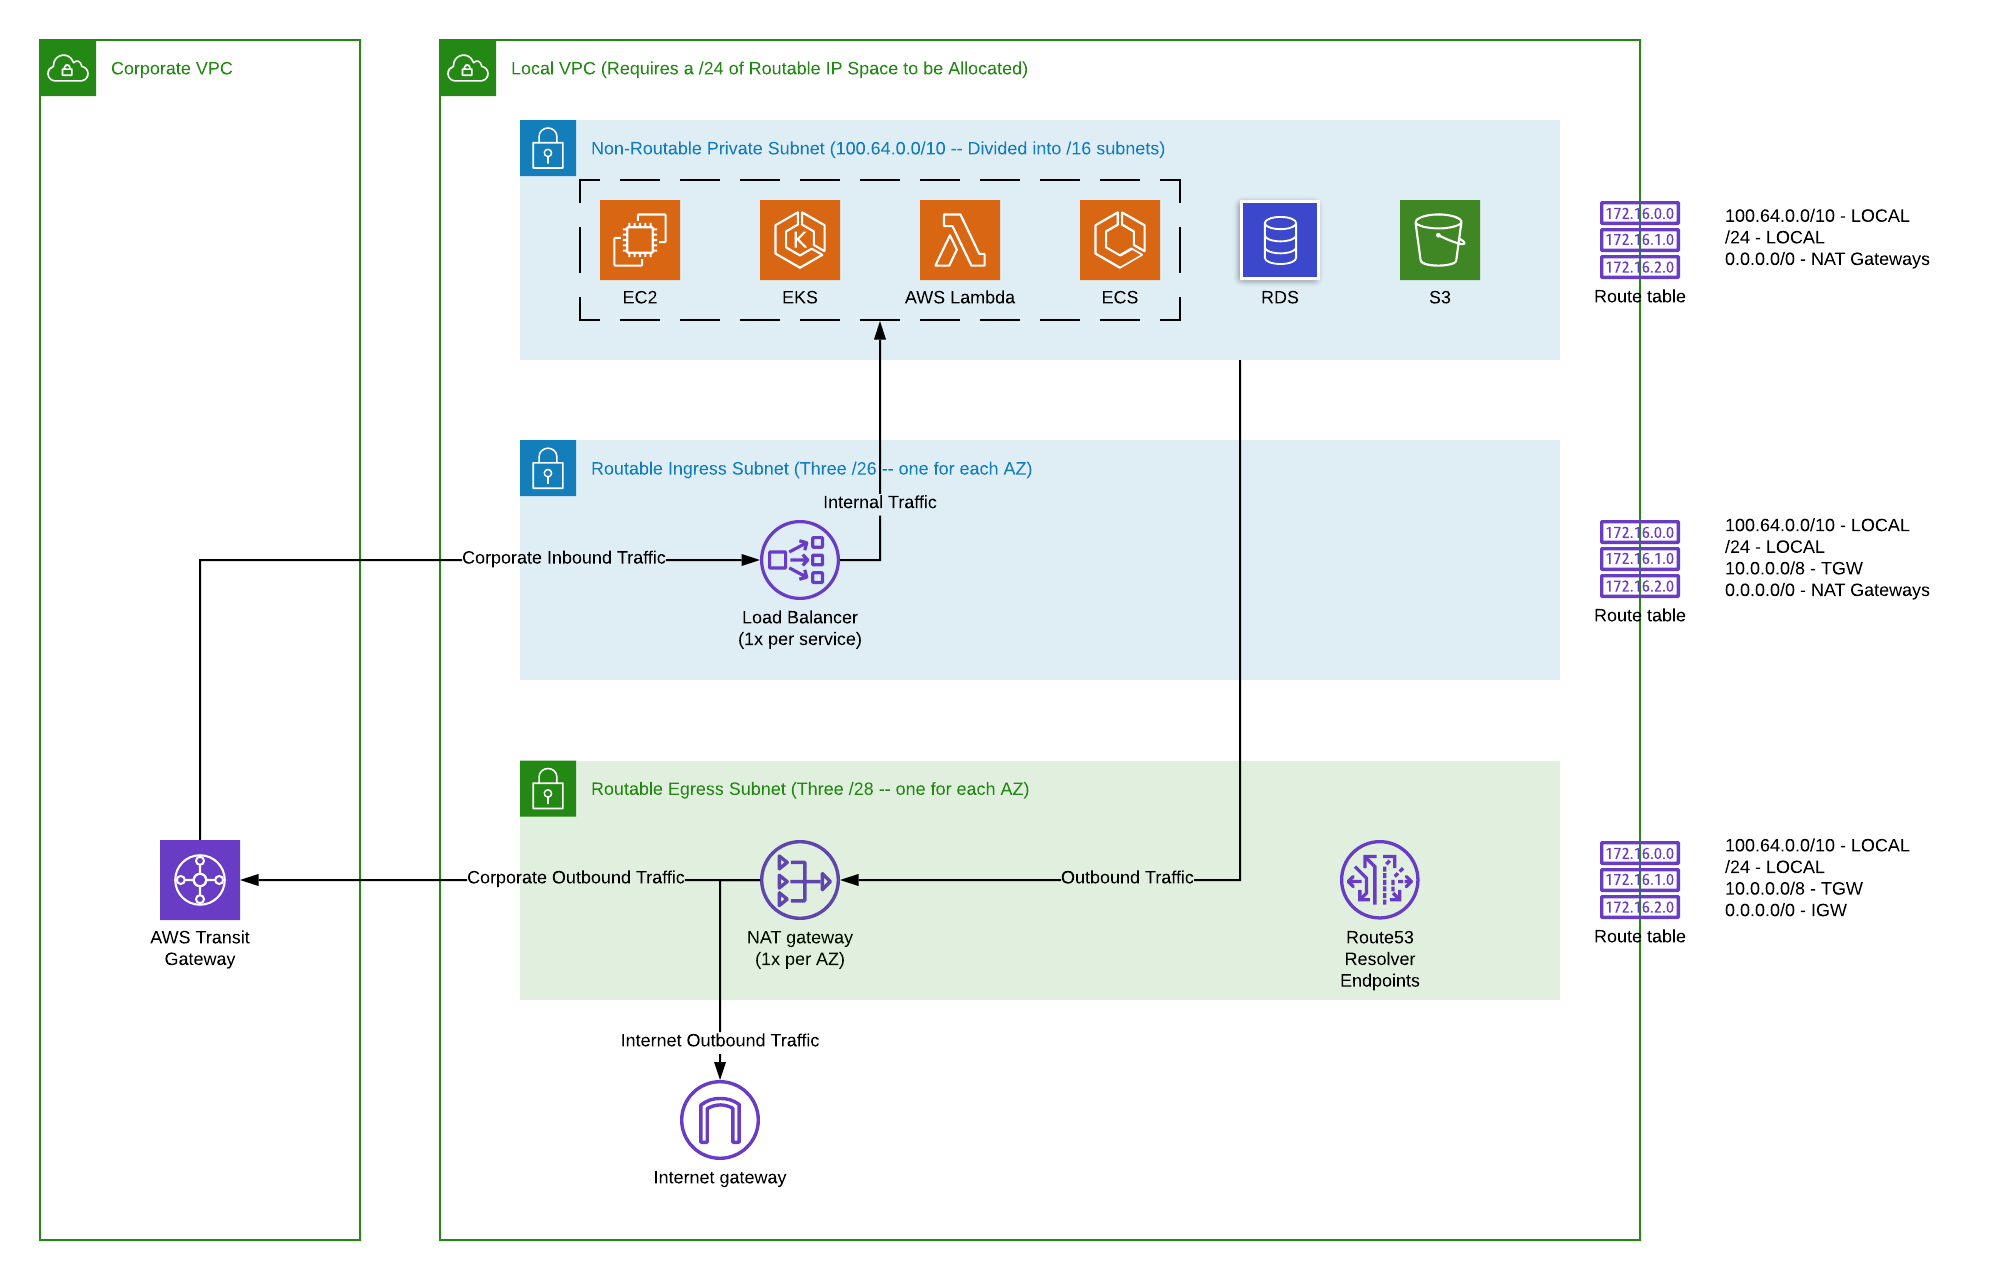
The first step is to design your VPC. For a remoteiot vpc network aws, a common and secure architecture involves:
- VPC Creation: Define a CIDR block for your VPC (e.g., `10.0.0.0/16`). This is your private IP address space.
- Public Subnet: A subnet with direct access to the internet via an Internet Gateway. This is where your Bastion Host (jump server) will reside, allowing secure SSH access into your private network.
- Private Subnet(s): Subnets without direct internet access. Your IoT devices (Raspberry Pis) and backend services (e.g., databases, application servers) will reside here for maximum security.
- Internet Gateway (IGW): Allows communication between your VPC and the internet.
- NAT Gateway (NAT GW) or NAT Instance: Placed in the public subnet, this allows instances in your private subnets to initiate outbound connections to the internet (e.g., for software updates) without being directly exposed to inbound internet traffic.
- Route Tables: Control traffic routing within your VPC and to/from the internet.
- Security Groups and Network ACLs (NACLs): Act as virtual firewalls to control inbound and outbound traffic at the instance and subnet levels, respectively.
This design ensures that your sensitive IoT data and devices are never directly exposed to the public internet, enhancing the security posture of your remoteiot vpc network aws.
Configuring Subnets, Route Tables, and Internet Gateways
Let's break down the practical steps within the AWS Management Console:
- Create a VPC:
- Navigate to the VPC dashboard in AWS.
- Click "Create VPC."
- Give it a name (e.g., `RemoteIoT-VPC`) and specify a CIDR block (e.g., `10.0.0.0/16`).
- Create an Internet Gateway (IGW):
- Under "Internet Gateways" in the VPC dashboard, click "Create internet gateway."
- Name it (e.g., `RemoteIoT-IGW`).
- Attach it to your newly created VPC.
- Create Subnets:
- Under "Subnets," click "Create subnet."
- Create a Public Subnet (e.g., `RemoteIoT-Public-Subnet-1A` with CIDR `10.0.1.0/24`) and associate it with your VPC and an Availability Zone.
- Create a Private Subnet (e.g., `RemoteIoT-Private-Subnet-1A` with CIDR `10.0.2.0/24`) and associate it with your VPC and the same Availability Zone.
- Configure Route Tables:
- Public Route Table:
- Create a new route table (e.g., `RemoteIoT-Public-RT`).
- Associate it with your Public Subnet.
- Add a route: Destination `0.0.0.0/0` (all internet traffic) to Target your Internet Gateway.
- Private Route Table:
- Create a new route table (e.g., `RemoteIoT-Private-RT`).
- Associate it with your Private Subnet.
- Initially, this route table will only have a local route for the VPC's CIDR. You'll add a route to the NAT Gateway later.
- Public Route Table:
- Create a NAT Gateway (for outbound internet from private subnet):
- Under "NAT Gateways," click "Create NAT Gateway."
- Select your Public Subnet.
- Allocate a new Elastic IP (EIP) for it.
- Once created, go to your Private Route Table and add a route: Destination `0.0.0.0/0` to Target your new NAT Gateway.
- Configure Security Groups:
- Create a Security Group for your Bastion Host (e.g., `Bastion-SG`): Allow inbound SSH (port 22) from your specific public IP address or a trusted range.
- Create a Security Group for your Raspberry Pi devices (e.g., `RaspberryPi-SG`): Allow inbound SSH (port 22) from the Bastion Host's Security Group. Allow other necessary ports for IoT communication (e.g., MQTT on 8883, HTTP/S on 80/443 if needed for specific services) only from trusted sources (e.g., specific AWS services or other internal Security Groups).
By following these steps, you've established the fundamental network infrastructure for your remoteiot vpc network aws, providing a secure and controlled environment for your IoT devices.
Preparing Your Raspberry Pi for AWS Integration
Once your AWS VPC is set up, the next crucial step is to prepare your Raspberry Pi to become a secure node within this network. This involves flashing the OS, enabling SSH, and configuring network settings to ensure it can communicate with your AWS resources.
- Flash Raspberry Pi OS:
- Download Raspberry Pi Imager from the official Raspberry Pi website.
- Choose "Raspberry Pi OS Lite (64-bit)" for a headless setup without a desktop environment, which is ideal for IoT.
- Select your microSD card.
- Crucially, before writing, click the gear icon (or Ctrl+Shift+X) to access advanced options:
- Enable SSH: Set a password or, even better, provide your public SSH key.
- Configure Wi-Fi: Enter your SSID and password to ensure the Pi connects to your local network upon first boot.
- Set hostname (e.g., `iot-pi-01`).
- Write the image to the microSD card.
- Initial Boot and SSH Access:
- Insert the microSD card into your Raspberry Pi and power it on.
- Once booted, you should be able to find its IP address on your local network (e.g., via your router's admin page or a network scanner like Nmap).
- From your local machine, use an SSH client (like PuTTY or `ssh` in WSL/Linux/macOS) to connect: `ssh pi@
`. - If you set a password, enter it. If you used an SSH key, ensure your client is configured to use it.
- Update and Upgrade:
- Once connected, always update your system:
sudo apt update sudo apt upgrade -y - This ensures your Pi has the latest security patches and software.
- Once connected, always update your system:
- Install Necessary Tools:
- Depending on your IoT project, you might need to install specific libraries or tools. For instance, if you're using AWS IoT Core, you might install the AWS IoT Device SDK.
Your Raspberry Pi is now ready to be securely integrated into your AWS VPC network. This preparation is a vital step in mastering remoteiot vpc networks with raspberry pi on aws.
Establishing Secure Connectivity: SSH and VPN Options
The cornerstone of a robust remoteiot vpc network aws is secure communication. You need a reliable and encrypted way to access your Raspberry Pi devices, especially when they are located in private subnets. This comprehensive guide will delve into the technical aspects of AWS VPC, SSH configurations, and remoteiot integration.
SSH Over AWS VPC: A Secure Foundation
For accessing Raspberry Pi devices located in a private subnet within your AWS VPC, the most common and secure method is to use a Bastion Host (also known as a jump server). This host resides in your public subnet and acts as a gateway for SSH connections to your private instances.
- Launch a Bastion Host (EC2 Instance) in the Public Subnet:
- Choose a small, cost-effective EC2 instance type (e.g., `t2.micro` or `t3.nano`).
- Select an Amazon Machine Image (AMI) like Amazon Linux 2 or Ubuntu Server.
- Ensure it's launched into your Public Subnet.
- Assign the `Bastion-SG` Security Group you created earlier.
- Create a new Key Pair (e.g., `bastion-keypair.pem`) and download it. You'll use this to SSH into the Bastion Host.
- Enable "Auto-assign Public IP" for this instance.
- Configure SSH Agent Forwarding (Recommended):
- This allows you to use your local SSH key to connect to the Raspberry Pi *through* the Bastion Host, without storing your private key on the Bastion Host itself.
- On Linux/macOS:
ssh-add ~/.ssh/your_local_private_key.pem ssh -A ec2-user@ - On Windows (PuTTY/Pageant):
- Load your private key into Pageant (PuTTY's authentication agent).
- In PuTTY, under Connection -> SSH -> Auth, check "Allow agent forwarding."
- Connect to your Bastion Host.
- Connect to Raspberry Pi via Bastion Host:
- Once SSH'd into the Bastion Host, you can then SSH into your Raspberry Pi in the private subnet:
ssh pi@ - Since you enabled agent forwarding, your local key will be used to authenticate with the Pi.
- Ensure the `RaspberryPi-SG` allows inbound SSH from the `Bastion-SG`.
- Once SSH'd into the Bastion Host, you can then SSH into your Raspberry Pi in the private subnet:
This method provides a highly secure way to manage your remote IoT devices. You'll learn how to set up secure networks, ensuring that only authorized traffic can reach your Raspberry Pi fleet.
While SSH over a Bastion Host is excellent for management, for continuous, secure data communication between your Raspberry Pis and AWS services, you'll often leverage AWS IoT Core. AWS IoT Core provides secure, bi-directional communication between internet-connected devices (like your Raspberry Pis) and the AWS Cloud, using protocols like MQTT, HTTPS, and WebSockets, with built-in authentication and authorization mechanisms.
Best Practices for a Scalable and Resilient Remote IoT VPC Network
Setting up a remoteiot vpc network with a raspberry pi on aws is a powerful undertaking. It provides a foundation for building secure, scalable, and efficient networks tailored to your needs. To ensure your deployment is robust and future-proof, consider these best practices:
- Least Privilege Principle: Grant only the necessary permissions to users, roles, and devices. For instance, your Raspberry Pi's IAM role should only have permissions to publish to specific MQTT topics or interact with designated AWS services.
- Network Segmentation: Utilize multiple private subnets for different purposes (e.g., one for IoT devices, another for backend processing servers, another for databases). This limits the blast radius in case of a security breach.
- Automate Deployment: Use AWS CloudFormation or Terraform to define your VPC, subnets, security groups, and even EC2 instances as code. This ensures consistency, repeatability, and faster deployments.
- Monitor and Log Everything: Enable AWS CloudWatch Logs for your EC2 instances and VPC Flow Logs for your network traffic. This provides invaluable insights for troubleshooting, security auditing, and performance monitoring.
- Regular Security Audits: Periodically review your Security Groups, NACLs, and IAM policies. Use AWS Config to track changes and identify non-compliant resources.
- Redundancy and High Availability: Deploy resources across multiple Availability Zones (AZs) within your VPC to protect against single points of failure. For critical IoT applications, consider redundant Raspberry Pi devices or failover mechanisms.
- Device Identity and Certificates: For IoT devices, use X.509 certificates for authentication with AWS IoT Core. This is far more secure than relying solely on usernames and passwords.
- Over-the-Air (OTA) Updates: Implement a secure mechanism for pushing software and firmware updates to your Raspberry Pi devices remotely. AWS IoT Device Management offers features for this.
- Cost Optimization: Monitor your AWS usage closely. Use smaller EC2 instances for your Bastion Host, leverage AWS Free Tier where possible, and clean up unused resources.
- Documentation: Keep thorough documentation of your network architecture, configurations, and deployment procedures.
By following the steps and tips outlined in this article, you can create a secure, scalable, and efficient remoteiot vpc network with raspberry pi and aws that stands the test of time.
Overcoming Challenges and Troubleshooting Common Issues
Even with the best planning, you might encounter issues when setting up a complex system like a remoteiot vpc network aws. Here are some common challenges and troubleshooting tips:
- Connectivity Issues to Raspberry Pi:
- Check local network: Ensure your Raspberry Pi is connected to your local Wi-Fi and has an IP address.
- SSH service: Verify that the SSH server is running on your Raspberry Pi (`sudo systemctl status ssh`).
- Firewall on Pi: If you've configured a firewall (e.g., `ufw`), ensure port 22 is open.
- Incorrect IP: Double-check the private IP address of your Raspberry Pi within the VPC.
- Bastion Host SSH Problems:
- Security Group: Ensure your Bastion Host's Security Group allows inbound SSH (port 22) from your source IP address.
- Key Pair: Verify you're using the correct `.pem` file and that its permissions are set correctly (`chmod 400`).
- Public IP: Confirm the Bastion Host has a public IP address.
- Raspberry Pi Cannot Access Internet (from private subnet):
- NAT Gateway/Instance: Verify your NAT Gateway/Instance is running and correctly configured in the public subnet.
- Private Route Table: Ensure the private subnet's route table has a default route (`0.0.0.0/0`) pointing to the NAT Gateway.
- Security Groups/NACLs: Check that outbound rules allow traffic to the internet (e.g., HTTP/HTTPS on ports 80/443).
- AWS IoT Core Connection Issues:
- Certificates: Ensure your Raspberry Pi has the correct device certificates and root CA certificate installed and configured for your IoT application.
- Policy: Verify that the AWS IoT policy attached to your device certificate grants the necessary permissions (e.g., `iot:Connect`, `iot:Publish`).
- Endpoint: Confirm the correct AWS IoT Core endpoint is being used by your device.
- Resource Limits:
- AWS has service limits. If you're deploying many resources, you might hit limits (e.g., number of VPCs, Elastic IPs). Request limit increases if necessary.
Effective troubleshooting often involves systematically checking each layer of your setup, from the physical Raspberry Pi to the AWS VPC network configuration and finally to the application layer.
Future-Proofing Your Remote IoT Deployment
As IoT evolves, so too must your infrastructure. A well-designed remoteiot vpc network aws provides a flexible foundation for future growth and technological advancements. Here are considerations for future-proofing your deployment:
- Edge Computing Capabilities: As your Raspberry Pis collect more data, consider processing some of it at the edge using AWS IoT Greengrass. This reduces latency, saves bandwidth, and allows for offline operation.
- Serverless Architectures: Leverage AWS Lambda for event-driven processing of IoT data, and Amazon DynamoDB for scalable NoSQL database storage. This reduces operational overhead and scales automatically.
- Machine Learning at the Edge: Explore deploying machine learning models directly onto your Raspberry Pis (e.g., using TensorFlow Lite or AWS Panorama) for real-time inference and intelligent decision-making closer to the data source.
- Containerization: Use Docker containers on your Raspberry Pis to package your IoT applications. This ensures portability, consistency, and easier deployment across different devices.
- Advanced Analytics: Integrate with AWS analytics services like Amazon Kinesis for real-time data streaming, Amazon S3 for data lake storage, and Amazon QuickSight for business intelligence dashboards.
- Security Enhancements: Stay updated with AWS security best practices. Consider implementing AWS WAF for web application security, AWS Shield for DDoS protection, and AWS GuardDuty for intelligent threat detection.
- Infrastructure as Code (IaC): Continuously refine your CloudFormation or Terraform templates. This makes it easier to replicate your environment, manage changes, and even tear down and rebuild for testing.
And there you have it—a comprehensive guide to mastering remoteiot vpc networks on raspberry pi with free aws services. Whether you’re a seasoned pro or just starting, this setup offers immense possibilities. By combining the affordability and flexibility of the Raspberry Pi with the robust, secure, and scalable infrastructure of AWS VPC, you are well-equipped to build the next generation of IoT solutions.
Conclusion
We’ve covered everything from the basics to advanced configurations, providing a comprehensive guide to setting up a remoteiot vpc network using raspberry pi on aws. We explored the critical synergy between Raspberry Pi's edge capabilities and AWS's cloud power, meticulously detailed the setup of your AWS VPC with subnets, route tables, and security groups, and guided you through preparing your Raspberry Pi for secure integration. Furthermore, we delved into establishing secure SSH connectivity via a Bastion Host and discussed vital best practices for building a scalable, resilient, and secure IoT infrastructure.
Setting up a remoteiot vpc network with a raspberry pi on aws is not merely a technical exercise; it's an investment in the future of your IoT projects. By embracing these principles and following the steps outlined, you can create a foundation that is not only secure and efficient today but also adaptable to the evolving demands of tomorrow's IoT landscape. This powerful combination empowers you to innovate with confidence, knowing your devices and data are protected within a private, controlled environment.
Now that you have the knowledge and tools, it's time to put them into action. We encourage you to start experimenting with your own remoteiot vpc network. Share your experiences in the comments below, or let us know if you have any questions. Your journey into mastering remote IoT VPC networks with Raspberry Pi on AWS has just begun!
Related Resources:

Detail Author:
- Name : Prof. Margie Reinger
- Username : beverly.bogisich
- Email : lgoldner@hotmail.com
- Birthdate : 1987-05-16
- Address : 87053 Danny Common Suite 501 Armstrongton, PA 25478
- Phone : 1-409-370-9719
- Company : Hackett, Hand and Hegmann
- Job : Housekeeping Supervisor
- Bio : Quidem optio ut dicta nostrum. Earum iusto qui assumenda sed enim aliquid ut. Nemo dicta cum porro autem. Quidem explicabo ut provident voluptatem ut quia tenetur sit. Eius et nobis officiis quae.
Socials
linkedin:
- url : https://linkedin.com/in/doradavis
- username : doradavis
- bio : Rem odit molestiae accusamus at eveniet qui aut.
- followers : 5528
- following : 741
instagram:
- url : https://instagram.com/ddavis
- username : ddavis
- bio : Quisquam fugit et id provident itaque. Laudantium saepe dolores iure.
- followers : 4901
- following : 2982
twitter:
- url : https://twitter.com/dora8809
- username : dora8809
- bio : Adipisci beatae quasi ut tempore. Facere quas laborum quis fugiat accusantium sint. Sint explicabo unde ipsa quia iusto qui in.
- followers : 5299
- following : 1433
tiktok:
- url : https://tiktok.com/@dora7170
- username : dora7170
- bio : Incidunt facilis aut nisi nobis deleniti doloribus quis.
- followers : 946
- following : 1750
facebook:
- url : https://facebook.com/doradavis
- username : doradavis
- bio : Doloribus quas qui perferendis labore ea in asperiores.
- followers : 1061
- following : 2114
